


-20%


Budget ✔️ KitchenAid Ice Cream Maker Stand Mixer Attachment, 2 Quart, W ⌛
Original price was: $74.95.$59.96Current price is: $59.96.
- Green products, guaranteed.
- Shop quality, shop with us.
- Experience the difference quality makes.
- 100% Quality Satisfaction

- Brand: KitchenAid
- Color: White
- Capacity: 2 Quarts
- Special Feature: Manual
- Material: Plastic
- In small batches and enjoy right out the bowl.
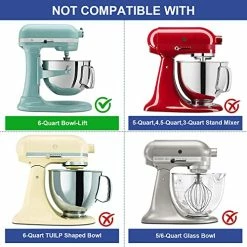
- Powered by the KitchenAid Stand Mixer* Fits all Tilt-Head Stand Mixers, except models KSM3316 and KSM3317. Fits all Bowl-Lift Stand Mixers, except models K5SS, KSM5, KSM50, KSM500 and KSM450.
- Frozen Treats in Under 30 minutes Our 2 quart bowl lets you make your favorite ice creams, gelatos or sorbets in less than 30 minutes* *Excluding prep time.
- Bowl Easily Connects to your KitchenAid Stand Mixer* Redesigned assembly and new handles easily connect to the Stand Mixer* to quickly start churning your favorite recipes. *Sold separately.
- Redesigned Dasher for Thorough Ingredient Incorporation Rotates inside the bowl to spread, scrape and mix for even freezing.
- Easy to Clean Bowl Once the bowl has reached room temperature, simply clean with warm, soapy water.
- Model KSMICM Includes (1) Ice Cream Bowl, (1) Dasher, (1) Hub Assembly
| Color | White, fits 5 and 6 quart mixers |
|---|---|
| Style | New Ice Cream Maker Attachment, New Ice Cream Maker Attachment + Attachment, Silver, Discontinued |
7 reviews for Budget ✔️ KitchenAid Ice Cream Maker Stand Mixer Attachment, 2 Quart, W ⌛
Add a review
Related products
-20%

Original price was: $14.99.$11.99Current price is: $11.99.
-20%
Original price was: $20.99.$16.79Current price is: $16.79.
-20%
Original price was: $22.99.$18.39Current price is: $18.39.
-30%
Original price was: $114.95.$80.00Current price is: $80.00.
-20%
Original price was: $20.99.$16.79Current price is: $16.79.
-20%
Original price was: $59.98.$47.98Current price is: $47.98.
-20%

Original price was: $22.99.$18.39Current price is: $18.39.
-20%
Original price was: $13.99.$11.19Current price is: $11.19.
Tom F. –
My wife and I recently purchased a KitchenAid stand mixer from a well-known warehouse store. Their current model is the KV25M (it says Professional 550 HD on the motor) which appears to have almost identical specs, 575 watts, to the Kitchenaid Pro 600 and is also a bowl-lift model. (Even though it’s labeled a “5-1/2 Qt. mixer”, the bowl is actually 6 qt.) We’ve had the Ben & Jerry’s Ice Cream & Dessert Book from years but never owned an ice-cream maker. Within a week we decided we had to have the Kitchenaid Ice Cream Maker attachment.I did a lot of research before I actually bought it and was pretty clear on several points:- the bowl has to be solidly frozen in the freezer, preferably for at least 24 hours- the ice cream mixture has to be well-refrigerated, at least 2-8 hours- to keep things as cold as possible, quickly assemble the bowl and dasher attachment, turn on the mixer, and start pouring the refrigerated mixture into the machineAfter 20-30 minutes you’ll have ice cream with a soft-serve consistency. It can be pretty messy getting everything off the the dasher and out of the bowl. It melts really quickly, but it’s pretty tasty! It gets even better after it’s cured, so the sooner you can get it into the freezer after churning the better.We made “Jerry’s Chocolate” from the B&J Ice Cream Book. We left the bowl in the freezer for over 24 hours. We mixed up the custard and refrigerated it overnight. The next afternoon we did the churning, then we each had a small bowl and put the rest in the freezer. The results were…well, first let me finish!There’s a video on YouTube […] that shows how to use the Ice Cream Maker attachment. It’s the best one I found and it’s a pretty accurate depiction of how everything should be done, but the best part is at the end. In this video the cook scoops the soft-serve ice cream out of the bowl and puts it into a small, flat pan. She covered it with aluminum foil and put it into the freezer. Then she takes it out of the freezer and using an ice-cream scoop, scrapes the scoop along the length of the pan, producing perfect ice cream curls! After some research, I determined that she is probably using a “third size” stainless steel steam pan like this: Excellante Third Size 2-1/2-Inch Deep 24 Gauge Anti Jam Pans .I found that the dimensions were somewhat similar to a standard loaf pan; a little shallower, longer and wider, but pretty close so I used our non-stick bread loaf pan, putting down a layer of pastic wrap right on the surface of the ice cream to prevent icing and then covered the pan with aluminum foil. This worked great!Oh, and the results were FANTASTIC! The chocolate ice cream was creamy and smooth, with a deep chocolate taste. The consistency was just like ice cream should be, not icy, but hard enough to “chew” yet soft enough that it will quickly melt in your mouth.This was our first attempt and it was a resounding success! We’re looking forward to many more batches of yummy, creamy, tasty ice cream! And some gelato. And some sorbet.
William J. Stroud –
Extremely easy to use once you figure out how to attach the paddle to the mixer – the instructions are not the clearest. Try it one way and if it doesn’t seem to fit, turn the paddle mount around. After that, turn on the mixer, pour in the mix and come back in 15 minutes or so. Spoon into a container and pop in the freezer to become firm. The ice cream will be silky smooth and creamy.If you’re a beginner, like me, look for recipes that do not require egg yolks. They are easier to prepare and, I swear having tried both types of recipes, just as wonderful.Great ice cream maker that does not take up space in your kitchen.
Amanda G –
I’m a huge ice cream person, so when I bought my Kitchenaid mixer, I knew I wanted to have this attachment to make homemade ice cream/sorbets in. I’ve already used it 3 times since I bought it about a month ago. It’s super easy to use and is able to be used with both the regular stand mixer and the one with the raised arm mixer. It’s easy to clean (the paddle is dishwasher safe, but I just hand wash everything). I recommend placing the paddle in the freezer when you place the bowl in the freezer for 24 hours as well. This will help when you go to churn that everything is frozen. I’m excited to use this but with the cost of everything, its pricey to make homemade ice cream all the time, so definitely something I would like to do as a treat. Thankfully, I have a chest freezer that is relatively empty enough for me to keep the bowl in all the time. However, if you don’t have the space readily available, just make sure you do for at least 48 hours for the bowl to freeze before hand and then to cure the ice cream after churning it for a good 4-8 hours after.
RAMON NICHOLS –
My husband and I had not made ice cream since our childhood, and we were eager to find just the right ice cream maker. We had no idea Kitchen-Aid had the perfect attachment! What a wonderful tool for making fresh, ingredient-controlled ice cream! It took us a minute to figure out how to attach the —-, but once we did it was all smooth sailing! We made strawberry to start, adding the chopped berries about 20 minutes in as the directions said. The juice from them thinned the mixture out a bit, but not to worry….2 hours in the freezer, and good to go! We had a little trouble detaching the bowl from the mixer until it had a chance to sit for about 45 minutes. We’re guessing the icy conditions adhered it somewhat. After we allowed the bowl to thaw a bit, it easily came off. We then let it sit all night to be 100% sure it was room temperature before washing it. I love that it’s actually recommended to keep the bowl in the freezer for ice cream on a whim. It saves valuable storage in the pantry.I would recommend this attachment without reservation. Can’t wait to try every ice cream imaginable!!!
Chris Higgins –
Solid product that makes good ice cream and is easy to use. I tried the vanilla ice cream recipe that was included as well as the raspberry sherbet and both came out with incredible results. However the sherbet was not worth the ingredient cost haha.
joan latenser –
if unsure use manual and youtube has videos love it
Jeffrey Orr –
As described.